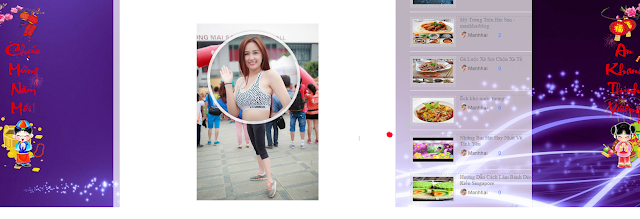
Với thủ thuật này dành cho những ai có site bán hàng online về các sản phẩm chuyên sử dụng hình ảnh để làm demo thì đây là thủ thuật rất hiệu quả.
Thường các bạn vào những site website lớn chuyên bán hàng về may mặc hay điện tử thường hay dùng thủ thuật này nên rất chuyên nghiệp và gúp khách hàng nhìn thấu đáo hơn và soi từng chi chi tiết nhỏ khi bạn rê chuột vào hình ảnh.Vậy thủ thuật làm như thế nào hãy cùng Manhhaiblog đi vào thực hiện nhé.

Tổng Quan ===> Chỉnh Sửa ===> ]]></b:skin>. coppy và pass code này ở đằng trước thẻ ]]></b:skin>.
******************************
/*######## Kính Lúp Soi Ảnh Sắc Nét - Manhhaiblog ########*/
* {margin: 0; padding: 0;}
.magnify {width: 200px; margin: 50px auto; position: relative;}
/*Lets create the magnifying glass*/
.large {
width: 215px; height: 215px;
position: absolute;
border-radius: 100%;
/*Multiple box shadows to achieve the glass effect*/
box-shadow: 0 0 0 7px rgba(255, 255, 255, 0.85),
0 0 7px 7px rgba(0, 0, 0, 0.25),
inset 0 0 40px 2px rgba(0, 0, 0, 0.25);
/*Lets load up the large image first*/
background: url('https://blogger.googleusercontent.com/img/b/R29vZ2xl/AVvXsEjqLN6ReMmcZz3QAw-XHwcJzJPtJdyly4brVSypAZH0kEClrnM9eCR4uXZs9hPma4J4HDw8ZYqIlvGxwMBzRl5LYQiNzoqY27qWIC5cvKjDK_1huuACC7AkHmiKDG7ivYgqQWglLR2sN0s/s1600/mai+phuong+thuy+.manhhaiblog5.jpg') no-repeat;
/*hide the glass by default*/
display: none;
}
/*To solve overlap bug at the edges during magnification*/
.small { display: block; }
****************************
===> Sau Đó Bạn Hãy Lưu Mẫu Lại Nhé.
Bước tiếp theo quay lại phần bài đăng , các bạn lưu ý khi đăng bài hãy để ở Phần HTML coppy đoạn code bên rưới pass vào phần HTML của bài đăng hoặc tiện ích wedget / javacript/HTML cũng được.
********************
<div class="magnify">
<br />
<div class="large">
</div>
<img class="small" src="https://blogger.googleusercontent.com/img/b/R29vZ2xl/AVvXsEjqLN6ReMmcZz3QAw-XHwcJzJPtJdyly4brVSypAZH0kEClrnM9eCR4uXZs9hPma4J4HDw8ZYqIlvGxwMBzRl5LYQiNzoqY27qWIC5cvKjDK_1huuACC7AkHmiKDG7ivYgqQWglLR2sN0s/s1600/mai+phuong+thuy+.manhhaiblog5.jpg" width="300" />
</div>
<script type="text/javascript">
$(document).ready(function(){
var native_width = 0;
var native_height = 0;
$(".magnify").mousemove(function(e){
if(!native_width && !native_height)
{
var image_object = new Image();
image_object.src = $(".small").attr("src");
native_width = image_object.width;
native_height = image_object.height;
}
else
{
var magnify_offset = $(this).offset();
var mx = e.pageX - magnify_offset.left;
var my = e.pageY - magnify_offset.top;
if(mx < $(this).width() && my < $(this).height() && mx > 0 && my > 0)
{
$(".large").fadeIn(100);
}
else
{
$(".large").fadeOut(100);
}
if($(".large").is(":visible"))
{
var rx = Math.round(mx/$(".small").width()*native_width - $(".large").width()/2)*-1;
var ry = Math.round(my/$(".small").height()*native_height - $(".large").height()/2)*-1;
var bgp = rx + "px " + ry + "px";
var px = mx - $(".large").width()/2;
var py = my - $(".large").height()/2;
$(".large").css({left: px, top: py, backgroundPosition: bgp});
}
}
})
})
</script></div>
*************************
Thường các bạn vào những site website lớn chuyên bán hàng về may mặc hay điện tử thường hay dùng thủ thuật này nên rất chuyên nghiệp và gúp khách hàng nhìn thấu đáo hơn và soi từng chi chi tiết nhỏ khi bạn rê chuột vào hình ảnh.Vậy thủ thuật làm như thế nào hãy cùng Manhhaiblog đi vào thực hiện nhé.

( Ảnh demo )
******************************
/*######## Kính Lúp Soi Ảnh Sắc Nét - Manhhaiblog ########*/
* {margin: 0; padding: 0;}
.magnify {width: 200px; margin: 50px auto; position: relative;}
/*Lets create the magnifying glass*/
.large {
width: 215px; height: 215px;
position: absolute;
border-radius: 100%;
/*Multiple box shadows to achieve the glass effect*/
box-shadow: 0 0 0 7px rgba(255, 255, 255, 0.85),
0 0 7px 7px rgba(0, 0, 0, 0.25),
inset 0 0 40px 2px rgba(0, 0, 0, 0.25);
/*Lets load up the large image first*/
background: url('https://blogger.googleusercontent.com/img/b/R29vZ2xl/AVvXsEjqLN6ReMmcZz3QAw-XHwcJzJPtJdyly4brVSypAZH0kEClrnM9eCR4uXZs9hPma4J4HDw8ZYqIlvGxwMBzRl5LYQiNzoqY27qWIC5cvKjDK_1huuACC7AkHmiKDG7ivYgqQWglLR2sN0s/s1600/mai+phuong+thuy+.manhhaiblog5.jpg') no-repeat;
/*hide the glass by default*/
display: none;
}
/*To solve overlap bug at the edges during magnification*/
.small { display: block; }
****************************
===> Sau Đó Bạn Hãy Lưu Mẫu Lại Nhé.
Bước tiếp theo quay lại phần bài đăng , các bạn lưu ý khi đăng bài hãy để ở Phần HTML coppy đoạn code bên rưới pass vào phần HTML của bài đăng hoặc tiện ích wedget / javacript/HTML cũng được.
********************
<div class="magnify">
<br />
<div class="large">
</div>
<img class="small" src="https://blogger.googleusercontent.com/img/b/R29vZ2xl/AVvXsEjqLN6ReMmcZz3QAw-XHwcJzJPtJdyly4brVSypAZH0kEClrnM9eCR4uXZs9hPma4J4HDw8ZYqIlvGxwMBzRl5LYQiNzoqY27qWIC5cvKjDK_1huuACC7AkHmiKDG7ivYgqQWglLR2sN0s/s1600/mai+phuong+thuy+.manhhaiblog5.jpg" width="300" />
</div>
<script type="text/javascript">
$(document).ready(function(){
var native_width = 0;
var native_height = 0;
$(".magnify").mousemove(function(e){
if(!native_width && !native_height)
{
var image_object = new Image();
image_object.src = $(".small").attr("src");
native_width = image_object.width;
native_height = image_object.height;
}
else
{
var magnify_offset = $(this).offset();
var mx = e.pageX - magnify_offset.left;
var my = e.pageY - magnify_offset.top;
if(mx < $(this).width() && my < $(this).height() && mx > 0 && my > 0)
{
$(".large").fadeIn(100);
}
else
{
$(".large").fadeOut(100);
}
if($(".large").is(":visible"))
{
var rx = Math.round(mx/$(".small").width()*native_width - $(".large").width()/2)*-1;
var ry = Math.round(my/$(".small").height()*native_height - $(".large").height()/2)*-1;
var bgp = rx + "px " + ry + "px";
var px = mx - $(".large").width()/2;
var py = my - $(".large").height()/2;
$(".large").css({left: px, top: py, backgroundPosition: bgp});
}
}
})
})
</script></div>
*************************
==> Sau đó xuất bản bài đăng hoặc lưu wedget lại là ok bây giờ hãy quay lại trang và thưởng thức nhé.


Đăng nhận xét Blogger Facebook Disqus